Making a pair of shoes is quite the journey – part science, part craft.
Imagine all the machines and skilled hands working together.
Let’s walk through those stages together, step by step, explaining what happens and why it matters.
Shoe Manufacturing Key 8 Steps: From Idea to Finished Pair
Here are the main stages, each one building on the last. In each step below, we’ll explain what happens, why it’s important, and share tips on what to watch out for.
1. Concept to Tech Pack

This is where your idea turns into a clear instruction manual for the factory.
Think of the Tech Pack as a blueprint for your shoe. It brings your sketches, measurements, and materials list into one document so the factory knows exactly what to make.
A good tech pack keeps everyone on the same page and “cuts down on back-and-forth, reduces errors, and brings a product to market faster”.
In short, a complete tech pack saves time, cuts costs, and gets your shoe right sooner.
What goes into a tech pack? Common elements are:
- Flat sketches: Clean drawings of the shoe’s front, side, and back views. These show how the panels and seams fit together.
- Measurements & grading rules: All critical dimensions (like length, width) for your sample size, plus instructions on how each size up or down should change.
- Bill of Materials (BOM): A full list of every material needed – fabrics (upper material, lining), trims (laces, eyelets, threads), labels (brand tags, care tags), and even packaging (boxes, tissue, hangtags).
- Construction notes: Any special sewing or reinforcement details (e.g. “use taped eyelets,” or “add foam under heel” ).
- Artwork & labeling: Where logos, prints, or size tags go on the shoe.
- Packaging specs: What box and tissue to use, and how to fold or insert the shoe.
All this is bundled into one document. The factory uses it to quote costs and build a sample.
If you skip details (for example forgetting to specify the outsole color or a special logo size), the sample might come out wrong.
A clear tech pack means fewer surprise changes later.
Tip: Always double-check your tech pack. A missing material or unclear note will cost time. Make sure the style number or name of each part is consistent, and include color codes or swatches so the factory matches your vision.
The goal in this stage is one master document everyone trusts. A good tech pack lets the factory build the first sample without guessing.
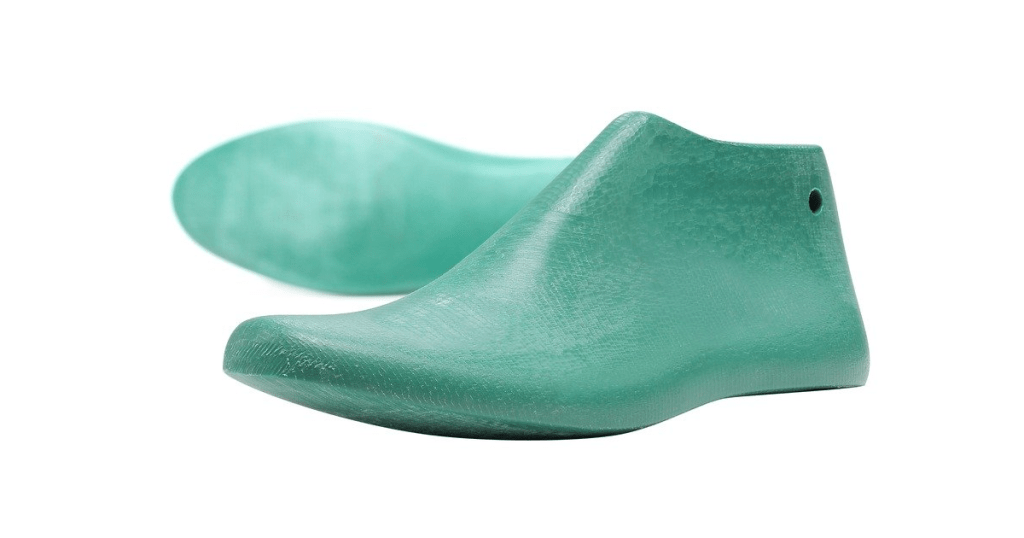
2. Lasts & Fit Grading
Next, we shape the shoe around the foot.
This involves the last (the foot-shaped mold) and pattern grading (scaling up/down for each size).
First, pick a last shape. The last decides how the shoe looks and feels.
As one expert notes, “the last is the form used to define the shape of the shoe… The footwear last used by the factory will decide the look, fit, and shape of the shoe.”.
It can be made of wood, plastic, or aluminum. For example, a running-shoe last is low and rounded, while a dress shoe last might have a higher instep.
After choosing a last, the pattern for that last is made (often digitally) and a sample shoe is built, usually in a middle size (say US men’s 9 / women’s 7).
We check the fit on a real foot or foot form and adjust until it’s comfortable.
Then comes grading: using standard rules, the pattern is automatically scaled to every size you want.
In factories, “the sample size shoe pattern is always confirmed first. Afterward, the pattern master will make the pattern pieces for all remaining shoe sizes… This process of adjusting the pattern for each shoe size is called shoe pattern grading.”
For instance, each half-size might add about 4mm in length. Every panel or piece of the upper gets resized, and any extra seams or flaps are adjusted too.
It’s a lot of work: a sports shoe might have hundreds of individual pattern parts (each panel, lining piece, tongue, etc.), each graded to all sizes. The factory often uses computer software for grading – it takes your base pattern and the last’s size chart to stretch or shrink each piece.
Key goal of this step: A confirmed fit block.
Make sure the sample-size shoe is comfy and true to your design, then let the factory grade it carefully. Once patterns are graded and approved, you can move on without worrying that different sizes will fit oddly.
3. Materials & Sourcing

With the fit locked down, it’s time to gather materials. Every part of the shoe – upper, lining, midsole, outsole, even glue – needs a material choice.
For the upper, pick fabrics or leather (e.g. leather, mesh knit, canvas).
For the lining, often a softer textile or mesh is used. The midsole (the cushy layer underfoot) might be EVA foam, polyurethane (PU), or other cushioning material.
The outsole (the shoe’s bottom) is usually rubber or TPU for grip and durability.
Finally, choose adhesives: modern factories often use water-based glue (safer and eco-friendly) or strong solvent-based cement, depending on the design.
4. Cutting & Preparation

Now the shoes start to come to life in pieces.
In cutting, the factory cuts out all the shoe parts from rolls or sheets of your materials according to the patterns.
For large runs, factories use steel-cutting dies – basically giant cookie cutters.
A heavy metal die is bent into the shape of each pattern piece. Each die is labeled with the size and shape it cuts. In fact, you end up with one die for each part in each size – so hundreds of dies for all parts and sizes of a sneaker.
The factory stacks the material (say layers of leather or fabric) and uses a hydraulic press to punch out dozens of uppers, liners, insoles, etc., all at once.
For small or custom runs, they might skip dies and use lasers or automated cutting machines, which let them change patterns quickly without making new dies.
Laser cutting video:
Once cut, the parts are bundled.
Workers sort panels (quarter pieces, toe caps, linings) for each shoe size and often make “sewing kits” so stitchers can grab a bundle and know exactly which pieces go together. They also add any prep markings or temporary basting stitches as needed.
Good cutting is important because it saves material and work.
Key Goal: Have all the right parts, in the right amounts and orientation, ready for sewing.
This sets up the next steps cleanly. The factory should track how much material was used and how much is left (yield), so nothing goes missing later.
5. Stitching / Strobel

In stitching, the cut pieces are sewn together to form the shoe upper. It’s like assembling a puzzle.
Skilled operators use industrial sewing machines to sew panels to linings, add any padding, and reinforce areas.
For example, they sew on toe caps and heels, stitch down reinforcements around eyelets, and attach any foam collars or counters inside the heel for stiffness.
Many sneakers use Strobel construction.

This means instead of building on a hard insole board, the entire inside of the upper is stitched to a thin fabric “Strobel board” or sock-liner.
In other words, the shoe is essentially sewn together upside-down as one unit.
The result is a very flexible, sock-like interior. It’s great for comfort: you want that stitched seam to end up flat on the inside so it never rubs the foot.
If it’s not a Strobel sneaker, the factory might stitch the upper to a cardboard or textile insole later, but the principle is similar.
In either case, good stitching is crucial. Even stitches (no skipped spots), neat seam allowances, and strong thread (often nylon or polyester) mean the shoe won’t come apart.
Key goal for this step: A cleanly sewn upper (with lining) ready for lasting.
The inside feels smooth, outside looks tidy. Also, reinforcements (extra tape or small bar-tack stitches) are in the stress points so the shoe is ready for the next step: lasting (pulling it over the foot-shaped mold).
6. Lasting & Assembly
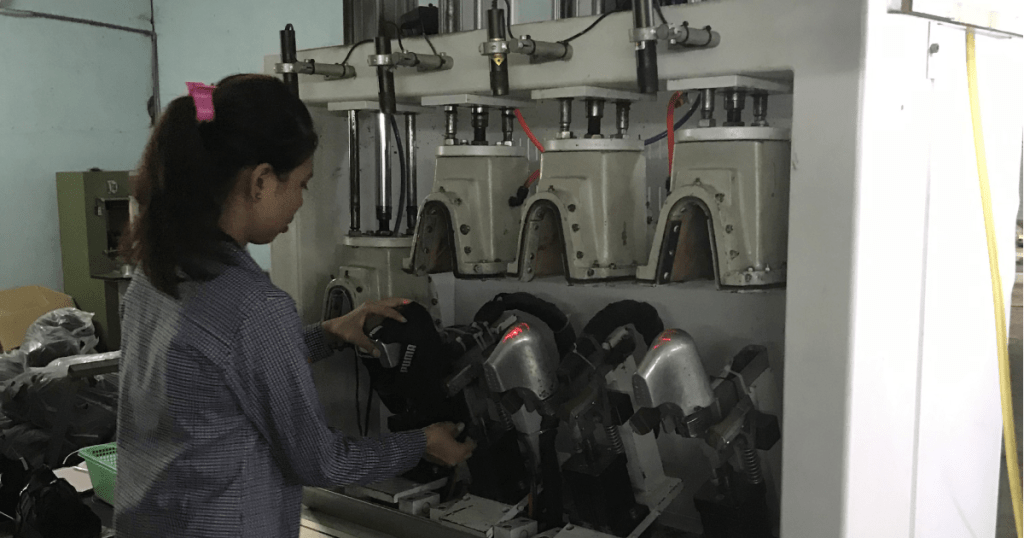
Here’s where things really take shape.
Lasting means pulling that stitched upper onto the last (the foot mold) and securing it so it holds the form of the foot.
What happens:
- Workers put the last (the mold) into a lasting machine.
- They slide the upper (the sewn part) over it like a sock.
- Clamps and tacks pull the upper tight and smooth so there are no wrinkles.
- Steam or warm air softens the material, helping it stretch nicely.
- Once it cools, it hugs the last’s shape — just like wet socks drying on a shoe tree.
Next comes the sole:
- The midsole (soft foam) and outsole (rubber bottom) are ready.
- Both the bottom of the upper and the top of the sole get coated with special glue.
- A worker lines them up carefully — then a press machine squeezes them together.
- The glue sets while the shoe cools down. This part is called cementing — it makes the upper and sole stick permanently.
This step sets the shoe’s shape permanently. It’s also when many shoes first look like the pair you recognize.
Key goal of this part: A smooth, crease-free upper now permanently bonded to its sole. The shape is locked in.
By the end of this stage, you should have a fully assembled shoe (minus final touches) ready for cleaning up.
7. Finishing & QC

Now the shoe is assembled. Time to finish up and inspect. The last is out, and we have a full shoe – but it needs tidying.
Workers will trim any loose threads and trim off excess material or glue from edges.
They clean off any marks. They straighten and tighten eyelets or lace up sneakers.
A final insole is inserted (if it wasn’t during lasting). Then each pair is labeled (size and style tags attached).
Next is Quality Control (QC).
Factories use AQL (Acceptable Quality Level) standards to check a sample from the batch. This means inspecting a few pairs closely for defects.
They look for issues like: crooked stitching, misaligned logos, glue spots on the midsole, scuffs, incorrect sizes or labels, weak spots, etc.
Key goal for this step: Only shoes that meet the agreed standards are packed.
At the end of this, any shoe with even minor problems is set aside for rework or discarded.
The good ones are now retail-ready: clean, correct, and as promised in the specs. Passing the QC means the batch is ready to box up.
8. Pack-out & Shipping
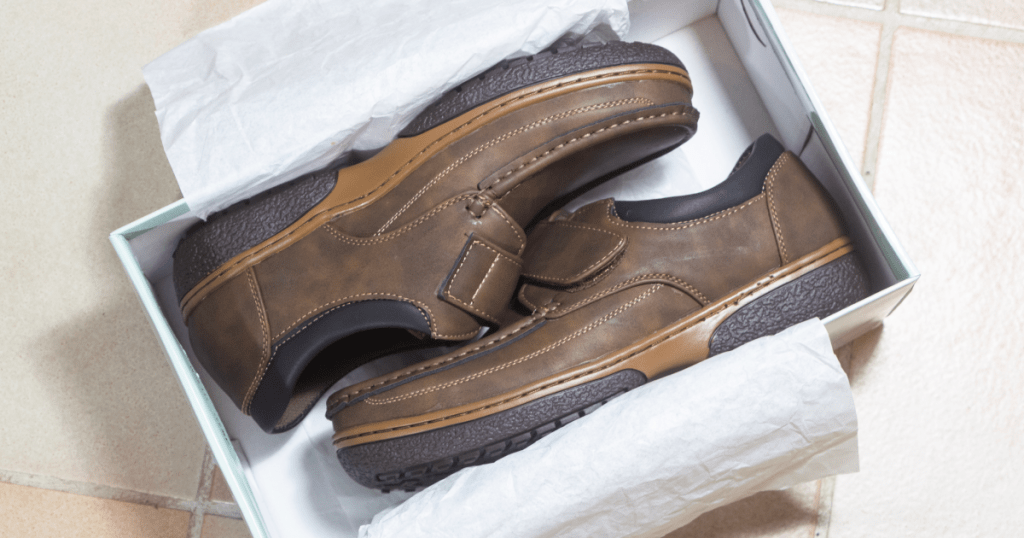
The final step is packing and shipping the shoes safely to their destination.
Each shoe pair goes into its shoe box, usually with tissue paper to prevent scuffs. Many factories add a little desiccant packet in the box – this tiny silica gel pack absorbs moisture so that leather doesn’t get moldy.
The box is closed and sealed. Then boxes are bundled (e.g. by 6 or 12 pairs) into shipping cartons. Good cartons are sturdy corrugated boards that can survive being stacked or dropped. Many brands test their packing with ISTA drop/stack tests to make sure the box protects the shoes.
Cartons must also meet retailer rules.
For example, retailers often dictate where and how labels and barcodes go on the carton. If the wrong label is used, or a barcode is unreadable, the retailer can charge the brand a fee (a chargeback).
The final goal is that all cartons pass the retailer’s checks: they are labelled correctly, strong enough, and dry.
Once packed, the shoes are loaded onto trucks or planes. If everything’s done right, they arrive ready to hit the shelves or your customers’ doorsteps.
Ready to turn your concept into a production-ready shoe?
Tristar helps brands select the right construction, source compliant materials, de-risk costing/MOQs, and hit timelines with factory partners in CN/VN/KH.
Just reach out to us!